
CapCut for PC: Download Windows 10/11 (Premium Unlocked)

CapCut, the popular mobile video editor, is no longer confined to small screens – you can now use CapCut on your PC running Windows 10 or 11! This is great news for creators who want the flexibility of a computer’s power and big display. In this article, we’ll show you how to download and install CapCut for PC and get the premium unlocked experience (all features enabled, no watermark). We’ll explore key features on Windows, compare it to the mobile version, and give tips for smooth editing on PC. By the end, you’ll be ready to edit videos like a pro on your desktop or laptop.
Why Use CapCut on PC?
You might wonder, if CapCut is a mobile app, why use it on PC when desktop editors like Adobe Premiere or DaVinci Resolve exist? Here are some reasons:
- Ease of Use: CapCut’s interface is known for being beginner-friendly and intuitivefree capcutmodapkz.com. On PC, it retains that simplicity, making it ideal for those who find professional desktop software too complex. You get a gentle learning curve with CapCut PC.
- Larger Screen Editing: Editing on a phone is convenient, but a bigger screen allows better precision. On PC, you can see finer details, manage longer timelines comfortably, and avoid the fat-finger problem of mobile.
- No Emulator Needed: Initially, to run CapCut on PC, users resorted to Android emulators. But ByteDance (CapCut’s developer) released an official PC version. It’s optimized for Windows 10/11, which means better performance and stability than using it through an emulator. No more fiddling with emulator settings – it runs as a native application.
- Cross-Platform Flexibility: CapCut for PC can sync with mobile via cloud if you log in. Start a project on your phone, fine-tune it on your PC, or vice versa. This cloud project feature is optional but can be a productivity boost.
- Premium Unlocked Features: If you get the Premium Unlocked variant (which we’ll discuss how), you have access to all advanced features (e.g., some Pro effects or stock assets) on a PC environment, without any subscription. Essentially, you’re getting a powerful editor for free on your computer.
- Leverage PC Power: PCs often have more processing power, meaning faster exports, ability to handle higher resolution footage (like 4K) more smoothly, and more storage for your media files. CapCut PC can take advantage of your system’s CPU/GPU to render videos quicker than a phone might.
In short, App on PC offers a blend of user-friendly design with the advantages of desktop hardware. For many content creators who are not professionals but want quality results, this is a perfect middle ground.
How to Download CapCut for Windows 10/11 (Installation Guide)
Downloading CapCut on PC is straightforward:
Method 1: Official Website (Free Version)
- Visit the official website or the Microsoft Store. ByteDance has made CapCut available on the Microsoft Store for Windows 10/11.
- Click Download for Windows. If on the Microsoft Store, click Get. This will download the installer.
- Run the installer and follow on-screen prompts. It’s a typical installation process – choose install directory, etc.
- Once installed, launch App. You now have the free PC version.
This official version is free but might require login for some features or show options to upgrade to “CapCut Pro”. However, many features are accessible without paying – free tier is quite generous.
Method 2: CapCut Premium Unlocked for PC (MOD version)
If you want a Premium Unlocked experience (all features and assets, no sign-in required, etc.), you might look for a modded version of APK for PC. Note: this is unofficial. Typically, modders release an altered version of the CapCut PC app that unlocks premium content. To use it:
- Download the CapCut Premium Unlocked PC installer from our link Download App for PC Premium. (Ensure you trust the source – we verify our links for safety.)
- Before installing, if you have the official App installed, you might need to uninstall it to avoid conflicts (or you can install the mod in a different folder – but typically safer to replace the official one if mod has same app ID).
- Run the mod installer. It should install App with the necessary patches applied.
- Launch CapCut. With the mod, you shouldn’t see any watermark on exports by default, and you should be able to use all effects, filters, and assets without logging in or subscribing. It essentially behaves like CapCut Pro but for free.
Always be cautious using modded software on PC – while mods on Android are common, on PC ensure your antivirus doesn’t flag it. Our provided version is scanned and used by many users safely.
Key Features of CapCut for PC
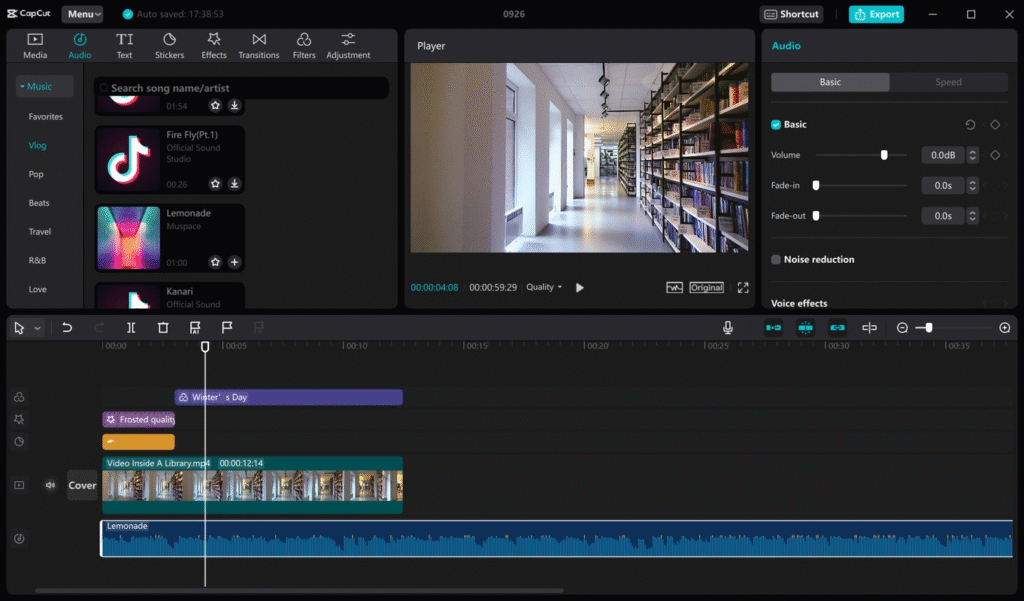
Once you open App on Windows, you’ll notice a layout that is quite familiar if you’ve used any video editor: a timeline at the bottom, a preview window top right, and media library top left. Let’s highlight some key features and how they shine on PC:
- Intuitive User Interface: CapCut’s PC interface is clean and straightforward. The design accommodates beginners – tools are clearly labeled (Split, Add Text, Filters, etc.) and the drag-and-drop functionality is smooth capcutmodapkz.com. Compared to some pro editors, CapCut doesn’t overwhelm you with dozens of tracks and obscure panels. This intuitive UI lowers the learning curve significantly.
- Advanced Editing Tools: Don’t be fooled by the simplicity – for PC includes advanced tools:
- Multi-track Timeline: You can have multiple video tracks (for overlays, cutaways) and audio tracks (music, sound effects). This allows layering content similar to professional software.
- Transitions & Effects: It comes with a library of transitions (cross-fade, slides, etc.) and cool effects (glitches, blurs, etc.). These are one-click to apply between or on clips. The PC version often gets more effect options than mobile due to easier updates.
- Keyframe Animation: Yes, you can animate properties (like position, scale, opacity) with keyframes to create custom animations – great for panning or zooming on a still image, or moving text around dynamically.
- Curve Speed and Slow Motion: CapCut’s famous speed curve (to create smooth slow-mo and speed ramp effects) is present. Using a mouse, it’s even easier to adjust the curve precisely compared to touch.
- Chromas and Background Removal: If you have green screen footage, CapCut PC has a Chroma Key tool to remove the background. Also, the AI Background Remove for portraits works here – albeit it can be intensive on PC resources.
- Text and Subtitles: The text tool includes various fonts and animations. On PC, typing and timing subtitles or titles is easier since you have a physical keyboard and can see more timeline for alignment.
- PC Optimization: CapCut is designed to work on Windows 10/11 seamlessly capcutmodapkz.com. It supports hardware acceleration – meaning if your computer has a decent GPU, it will use it for rendering previews and exporting faster. The software is lightweight compared to professional suites, so it runs well even on moderate laptops. (Recommended: at least 4GB RAM, dual-core processor. For best performance with HD/4K footage, 8GB+ RAM and a graphics card is ideal.)
- Asset Library and Stock Content: CapCut provides a library of royalty-free music, sound effects, and some stock videos/images. On PC, this is accessible via the Assets panel when you’re online. Premium Unlocked means you can use any asset without restriction. Want a swoosh sound or a background music track? Just drag it in. This built-in library is handy and saves time searching externally.
- Export Options: You can export videos up to 4K resolution. The PC version allows more control over export settings than mobile. You can choose format (usually MP4), resolution, frame rate, and even bitrate/quality. There’s no watermark on exports, of course, especially in premium unlocked version. The export speed will depend on your PC’s power, but generally it’s faster than exporting the same project on a phone.
Using CapCut on PC: Basic Workflow
Let’s briefly walk through how you’d typically create a video on CapCut for PC:
- Import Media: Click Import or drag and drop your video clips, images, and audio into the media bin. You can create folders to organize if needed. App for PC supports common formats like MP4, MOV, AVI for video; PNG, JPG for images; MP3, WAV for audio.
- Create Sequence: By default, CapCut will create a project with a certain resolution based on the first clip. You can adjust the project resolution in settings (for instance, set 1080×1920 for vertical video if making TikToks, or 1920×1080 for YouTube landscape).
- Build Your Timeline: Drag media down to the timeline in the order you want. You can place videos on the main track, add overlay videos on the track above, etc. Trim clips by clicking and dragging their ends, or split using the scissor tool at the playhead capcutmodapkz.com. It’s easy to rearrange by dragging clips left or right.
- Apply Edits: Add text by clicking Text then typing your caption. Adjust its style and duration on the timeline. Insert transitions by clicking the little white square between clips (or use the Transition library panel). Apply filters or color adjustment by selecting a clip and choosing Adjust (brightness, contrast, etc.). If you have images and want a Ken Burns effect (pan/zoom), use keyframes or the preset animation options (CapCut has in/out animations for clips like zoom in, slide up, etc.).
- Preview: Use the spacebar or play button to preview anytime. If playback is choppy (especially with multiple effects or high resolution), consider using the Preview Quality setting at half or quarter resolution to ease the load.
- Add Music/SFX: Import a music track or use CapCut’s library. Drag it to the audio track. You can cut music, move it, and even apply basic fade in/out. App for PC also has audio tools like volume keyframes and noise reduction if needed.
- Use Advanced Tools (if needed): For example, to do a picture-in-picture, you’d put a video on the main track and another on the track above, then resize the one above in the preview by dragging its corners. To remove a green screen, select the top clip, choose Chroma Key, use the eyedropper to pick the green background, adjust strength and shadow sliders until the background is gonecapcutmodapkz.com. To speed up a clip, select it and drag the speed slider or choose a speed preset/curve.
- Export: Satisfied? Click Export. In the export dialog, name your video, choose path, resolution, etc., and confirm. The export will render. You’ll see a progress bar. Once done, you can play the video or open the folder right from the dialog.
The whole process is designed to be newcomer-friendly, but also robust enough for intermediate editing tasks. It’s truly impressive how CapCut PC covers most needs short of extremely advanced compositing or color grading (which casual users rarely do).
Tips for a Great Experience on CapCut PC
- Keep Software Updated: If you’re using the official version, keep it updated for new features and fixes. If on mod, check communities for updated mod releases when new versions come out (or decide to stick to a version if it works for you).
- Save Projects Regularly: This PC might not have auto-save (or it does in background but just in case). Save your project (.capcut project file) occasionally to avoid losing work on a crash or power outage.
- Use Keyboard Shortcuts: To speed up editing, learn some basic shortcuts. For instance, Ctrl+B (or maybe Ctrl+Shift+S in CapCut, it might differ) to split a clip at playhead, Ctrl+Z to undo, Spacebar to play/pause, Delete key to remove a selected clip, etc. Check CapCut’s documentation or settings for a list of shortcuts. Using them can make your editing much faster.
- Leverage PC Only Features: The PC version allows some things easier than mobile, for example:
- Precise timeline zoom with mouse scroll or slider to make frame-perfect cuts.
- Replacing media: you can right-click a clip and possibly find “Replace” to swap footage, preserving edits – a handy feature for trying different shots.
- Third-party plugins: Currently CapCut doesn’t support plugins like Premiere does, but watch for updates – they might add integration or more advanced editing tools on PC as the software matures.
- Stay Organized: If you work on bigger projects, use the folder feature in the media bin to categorize your footage (e.g., “B-roll”, “Interviews”, “Images”, “Music”). Name your tracks or layers for clarity if needed (CapCut might not allow custom naming of tracks yet; if not, just be mindful).
- Troubleshooting: If CapCut PC is giving any Network Error or refusing to load some online assets, check your internet or VPN. The PC version might have region locks for some music due to copyright. If something isn’t loading, you could import your own assets as a workaround. Also, ensure your graphics drivers are up to date, as outdated drivers can cause preview glitches or performance issues in video editing apps.
CapCut vs Other PC Editors

How does CapCut for PC stack up against other desktop editing options? A quick comparison:
- CapCut vs iMovie (on Mac): iMovie is Mac-only, but conceptually similar (simple editor, free). CapCut on PC offers more modern effects (and is cross-platform). If you’re on Windows, is one of the best free equivalents to iMovie. Check our CapCut vs iMovie article for an in-depth comparison.
- CapCut vs KineMaster (PC version): KineMaster is primarily mobile; there isn’t a robust PC app. They have a Windows store app that is essentially an emulator for their Android version and it’s not great. Wins on PC clearly with a native app experience.
- CapCut vs Filmora: Filmora is a popular paid consumer editor on PC with tons of effects. Filmora offers more advanced editing than CapCut in some ways but at a cost (watermarks in free trial, then paid license). This App is free and arguably easier to use. If curious, see CapCut vs Filmora for feature and pricing breakdown.
- CapCut vs Adobe Premiere Pro: Premiere Pro is a professional tool with virtually no limits, but it’s expensive (subscription-based) and has a steep learning curve. CapCut can’t do everything Premiere can (no multicam editing, limited color grading tools, etc.), but for social media videos and simple projects, CapCut gets the job done much faster and without the headache. Essentially, CapCut is not aimed at Hollywood or broadcast editors – it’s for content creators, students, marketers, etc., who need efficiency and good-enough capabilities.
- CapCut vs Canva: Interesting comparison – Canva now has video editing in its online platform. Canva is great for quick templated designs and short promo videos (especially if you want graphics and text), but for fine control over a video timeline,This is PC is more flexible. Also, works offline on your PC, whereas Canva’s full capability is online. We have a CapCut vs Canva article exploring these use cases.
Download and Installation Recap (Internal Links)
- If you haven’t downloaded yet, grab CapCut PC from the official source or our provided link and follow the installation steps above.
- Mobile user looking to transition to PC? You might also consider reading our guide on How to Use CapCut Templates on Desktop – since templates are a big thing on mobile, that guide shows workarounds to utilize them on PC.
And if you’re encountering any difficulties such as not connecting (maybe due to region restrictions), our article on How to Fix CapCut Network Errors in 2025 might be helpful even for PC scenarios (tips like checking firewall, VPN, etc., can apply).
Conclusion
CapCut for PC brings the power and simplicity of editing to your Windows 10/11 computer, with the added perks of larger workspace and potentially faster performance. Whether you’re trimming a casual video or piecing together a polished vlog, CapCut PC (especially the Premium Unlocked version) is a formidable free tool in your arsenal. It bridges the gap between mobile convenience and desktop precision.
For those accustomed to mobile CapCut: you’ll feel right at home and likely create even better content with the PC app’s efficiency. For those new to altogether: it’s a fantastic starting editor on PC that can handle quite complex projects without the overwhelm of pro software. And the best part – it’s free, watermark-free, and packed with features that keep expanding.
Givefor PC a try for your next video project. You might find that editing on a computer – with CapCut’s friendly interface – is more enjoyable and productive, letting you focus on storytelling and creativity rather than wrestling with the software. And with the Premium Unlocked capabilities, you won’t hit any annoying paywalls.
Now that you have on your PC, why not push it to its limits? Try out some advanced effects or compare your editing flow with other tools. If you ever need to edit on the go, you can always switch back to the CapCut mobile app and vice versa, thanks to the seamless experience across devices. Happy editing on your PC – and we can’t wait to see what you create with CapCut!


One Comment