
CapCut vs KineMaster: Which App Edits Your Videos Better?

In the world of mobile video editing, CapCut and KineMaster are two heavyweight contenders. Both apps have millions of users and offer powerful editing capabilities right from your phone or tablet. If you’re deciding between them, or wondering if you should switch, this comparison is for you. We’ll break down the CapCut vs KineMaster showdown in terms of features, user interface, performance, and output quality. By the end, you’ll know which app is better suited for your video (and even photo) editing needs, whether you’re crafting TikToks, YouTube vlogs, or slideshow videos.
Overview of CapCut and KineMaster
CapCut: As discussed in previous sections, APK is a free video editor by ByteDance, available on Android, iOS, and PC. It’s especially popular for creating short-form content with effects, thanks to its integration with TikTok trends. App has no watermark on exports (for free), which is a big plus. It’s newer on the scene (global release around 2020) but has quickly become a favorite because of its rich features at no cost.
KineMaster: KineMaster has been around for much longer (initial release in 2013) and for years was considered the gold standard of mobile video editing. It’s available on Android and iOS (no official PC version, though some use emulators). KineMaster operates on a freemium model: free to use with all features, but exports on the free version carry a watermark. To remove watermark and access premium assets, you need a paid subscription. KineMaster is known for offering pro-grade control – multiple layers, blending modes, keyframe animation, chroma key, and more – while maintaining a relatively user-friendly interface for a mobile app.
Both apps are quite capable. Let’s compare them on key aspects:
User Interface and Workflow
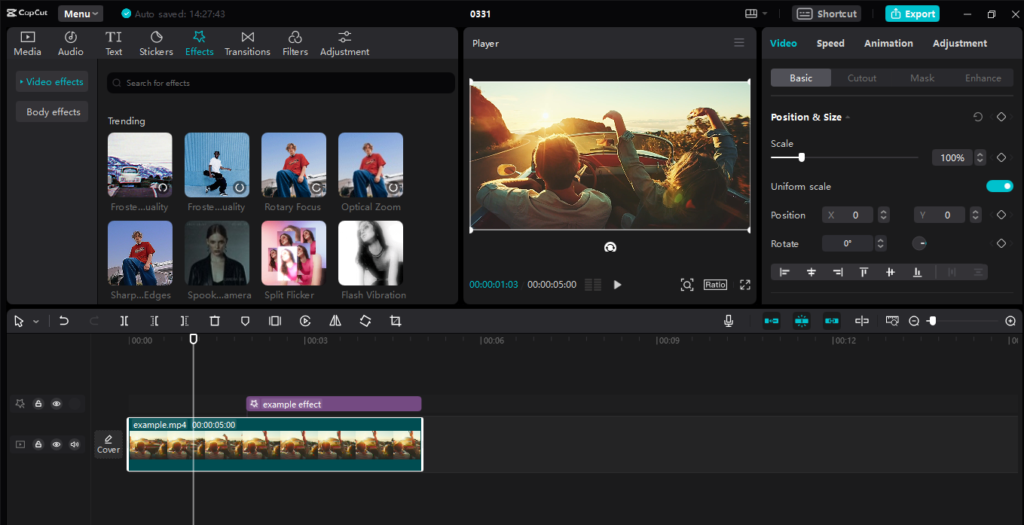
CapCut UI: CapCut’s interface on mobile is streamlined. When you load a project, you have your timeline at the bottom and a toolbar with icons for various tools (edit, audio, text, stickers, effects, etc.). Tapping a clip on the timeline brings up options specific to that clip (like split, speed, animation, etc.). Overall, App design is modern and minimalistic – a dark theme with simple icons. It’s intuitive after a bit of use, especially if you’ve edited before. The learning curve is moderate; it might feel slightly clunky on smaller screens when dealing with multiple layers, but for single-track editing with occasional overlays, it’s fine.
KineMaster UI: KineMaster’s interface feels a bit closer to desktop editors but adapted for touch. It has a circular menu on the right (the “wheel” menu) that expands to access media, layers, audio, etc. The timeline is at the bottom too, but KineMaster’s timeline interface shows multiple tracks more clearly layered on top of each other (video layers, effect layers, text layers, audio tracks). You can scroll the timeline vertically to see all layers.
Many users find KineMaster quite easy once they get used to the wheel menu; others find the interface slightly dated or busy compared to CapCut. KineMaster gives a strong sense of control – e.g., precise trimming with a preview, easy access to layer order, etc. However, because it offers more visible options, a complete newbie might be a bit overwhelmed at first sight.
Workflow:
- In CapCut, workflows often revolve around applying ready-made effects or filters quickly – for instance, tapping Effects and choosing a TikTok-style effect to apply over a range. CapCut also encourages using their library (sounds, stickers). It’s great for quick creative edits.
- In KineMaster, the workflow might involve manually building your project – adding multiple video layers, perhaps adjusting color via color filters and adjustments, perhaps using keyframe animations for any movement. KineMaster doesn’t have as many one-tap “template” style effects (it does have some built-in animations and effects, but fewer trendy ones). You often do things manually or by importing assets.
Customization:
- KineMaster offers more granular control in some ways: for example, you can individually adjust layer opacity, choose blending modes (like Screen, Multiply) for creative overlays – which CapCut currently either lacks or has in limited fashion (CapCut does have blending modes for overlays now? Actually, yes, the APP does have some blending for overlays but KineMaster had it earlier).
- KineMaster’s keyframe system allows keyframing almost any layer position/rotation and even certain effects. CapCut also has keyframes but KineMaster’s interface for it might be more detailed in showing graphs etc.
- KineMaster also has an Asset Store (if you are subscribed) with additional transitions, effects, fonts, stickers. CapCut provides assets for free (some might require login, but mostly free). CapCut’s repository is more about updating built-in effects; KineMaster’s asset store was one way to get more content (like new transitions or sound effects) albeit behind subscription.
In summary, CapCut’s UI is slightly more modern and simple, geared toward quick editing with effects, while KineMaster’s UI is feature-dense and offers more precise editing experience. Beginners might lean towards CapCut for simplicity (and no watermark), whereas power users often lauded KineMaster because it felt like having a mini Premiere Pro on your phone back in the day capcutmodapkz.com
Features Comparison
Both apps share many core features, but let’s break down differences:
- Multi-layer Support: KineMaster allows multiple video layers (number depends on device hardware – on a high-end phone you might get up to 8 layers 1080p, on lower devices fewer). CapCut also allows multiple overlays but I’m not sure if it has a fixed limit; practically, one or two overlays on mobile is common. KineMaster historically had the edge in layering, but CapCut’s catching up as phones get stronger.
- Chroma Key: Both have chroma key for removing green screen. KineMaster’s chroma key has controls for detail (similar strength/shadow sliders). Both do a good job, but KineMaster has had this feature for a long time, and it’s available even in the free version (with watermark though). CapCut’s chroma key works and also, as mentioned earlier, CapCut has AI background removal now for human subjects without green screen – KineMaster doesn’t have that.
- Keyframe Animation: Both support keyframes. KineMaster allows keyframing for layer position, rotation, scale, and even volume/envelope for audio. This App allows keyframing for similar parameters. KineMaster might allow keyframes on color filters or effects if applied as layers, but generally similar capabilities.
- Effects and Filters: This is a strong point for CapCut – it has tons of cool effects (neon outlines, glitch, motion blur, etc.) built-in. KineMaster has a smaller set of built-in “FX” effects (like mosaic blur, mirroring, etc.), and for more you might find some in the asset store. But qualitatively, CapCut’s effects are flashier and constantly updated. However, KineMaster’s approach is you can achieve some of those manually by layering (e.g., duplicate layer + blur + blending mode can create some glow effect).
- Transitions: KineMaster includes a variety of transitions (3D transitions, wipes, fades). Additional fancy ones can be downloaded from their asset store if subscribed.App has transitions too but not as a separate thing – on CapCut, many transitions are under the “Transition” menu between clips. I’d say both have plenty for average use, but if I recall, KineMaster might have had more classic transition options while CapCut might lean into simpler ones (it does have fun ones too like mask shapes).
- Text and Titles: Both let you add text layers with lots of font choices (KineMaster can import custom fonts if you put them in a folder; CapCut might allow custom fonts via uploading as well). CapCut has preset text animations and effects (like typewriter, bounce, etc.) and you can also animate by keyframes. KineMaster similarly has in/out animations for text (fade, pop, etc.). KineMaster might not have as many stylized templates for text, whereas often includes trending caption styles.
- Audio: Both allow multiple audio tracks, volume envelope control (KineMaster’s interface for audio is quite good – you can keyframe volume changes easily). Both have voice recording within the app. CapCut has a larger built-in music library for sure (thanks to TikTok integration) whereas KineMaster’s asset store has some music and sound effects but not nearly as extensive unless you import your own. CapCut also has speech-to-text (auto subtitles) and text-to-speech features – KineMaster doesn’t have those built-in.
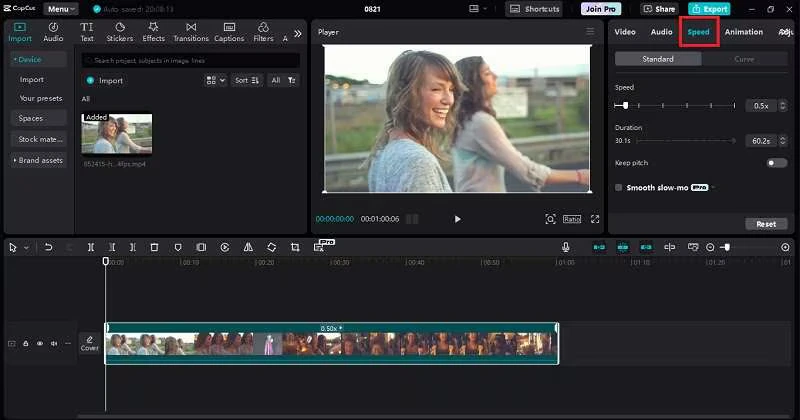
- Speed Control: Both can do speed adjustments with curve tools. KineMaster introduced a speed curve in later updates as well, similar to CapCut’s (with preset curves or custom). Both can do very slow or fast, but KineMaster historically limited how slow you could go (like 1/8 speed minimum); CapCut might allow slightly more depending on interpolation, not sure. Regardless, both handle slow-mo decently and have options to reduce pitch distortion in audio.
- Blending Modes: KineMaster has extensive blending modes for layers (classic ones like overlay, multiply, add, etc.), which is a pro feature for creative compositing. CapCut also has blending for overlay clips (I’ve seen options like overlay, soft light, etc. in this App when you overlay an image/video). They should be on par here.
- Resource Management: KineMaster projects can get heavy; it has a helpful feature where it will warn if your device is reaching limits (like if too many layers might cause performance issues). CapCut projects with lots of effects might lag too. In general, KineMaster was optimized to squeeze out performance, but also gave options like proxy (lower preview resolution). CapCut doesn’t have manual preview quality setting on mobile that I know of (on PC yes), it just tries best. On a powerful phone or tablet, both run smoothly with moderate complexity.
- Export Options: KineMaster allows up to 4K export (if device supports it) and up to 60fps. It also allows choosing bitrate quality. Free version exports have a watermark on the top right saying “Made with KineMaster”. CapCut allows 720p, 1080p, 2K, 4K exports and frame rates up to 60 I think, all without watermark. So the app clearly wins on not forcing a watermark or payment for high quality. KineMaster’s watermark is the big reason many people either pay or look elsewhere.
Performance and Stability
- KineMaster Performance: KineMaster is pretty well-optimized. It was engineered to utilize multi-core mobile CPUs effectively. It was one of the first to support multiple layers by scaling resolution of previews. On a high-end device, it’s smooth; on low-end, it gracefully disables some features (e.g., less layers or lower preview res) to keep working. It can occasionally crash if overtaxed, but auto-save often prevents data loss.
- CapCut Performance: CapCut is good, but some users have reported occasional lag or force-close, particularly on very long projects or heavy effects. It’s being improved continuously. On mid-range phones, it works fine for short videos, but might struggle if you loaded it with 10 minutes of 4K footage and lots of effects. That said, for typical use (e.g., a 1-minute video with several cuts and some filters) it’s generally okay. CapCut also leverages hardware well – for instance, on iOS it probably uses Apple’s Metal, and on newer Android with good GPUs, it’s fine.
- One difference: KineMaster creates kind of a project file where it references media. CapCut does too, but CapCut might encourage using their online assets which means needing a stable network at times (if you use cloud templates). KineMaster is fully offline except when downloading from the asset store.
- Stability wise, historically KineMaster was considered very stable for a mobile app; CapCut had a few early bugs but nothing too bad nowadays.
Special Considerations – Photo Editing and Additional Uses
The user’s query also mentions “Which App Is Better Edits Your Photo?” This is interesting because neither CapCut nor KineMaster is primarily a photo editor like Photoshop. Perhaps they mean using it to create photo slideshows or animations. Let’s interpret it as which app handles photo-based video or adds photo editing features:
- CapCut for photos: CapCut can certainly import photos and you can animate them (e.g., apply the Ken Burns effect by keyframing zooms). CapCut even has templates specifically for photo slideshows that sync to music (very popular for TikTok trends, e.g., 3D photo trend, etc.). CapCut also can remove background of a photo (AI cutout) which is like a photo editing feature. It doesn’t have a full photo editor’s toolkit (no brush or healing tool), but you can adjust brightness, contrast of a photo in CapCut to some extent through filters.
- KineMaster for photos: KineMaster can also do pan/zoom on photos (you set the start and end positions for a still image to create motion). KineMaster has some color adjustment tools as well. It doesn’t remove backgrounds of photos automatically (unless you shot on green screen or use chroma key but that’s only for solid backgrounds).
- If someone were making a photo montage video, both would do the job, but CapCut’s advantage is maybe its templates and effects that work well with photos (like the 3D Zoom effect that went viral – CapCut had a one-button effect to turn a photo into a 3D moving image, which KineMaster cannot do).
- Also, if they meant actual photo editing (as in editing a single image), neither is ideal – one would use PicsArt, Snapseed or similar. But video-wise, including photos, both handle them.
CapCut vs KineMaster: Pros and Cons
CapCut Pros:
- Completely free, no watermarkcapcutmodapkz.com.
- Lots of built-in effects, filters, and an extensive music library.
- Frequent updates with new creative features (staying on trend).
- Cross-platform (use it on PC and mobile).
- Great for social media style edits, auto-captions, text-to-speech, etc.
- Simpler interface for quick editing.
CapCut Cons:
- Lacks some advanced fine-tuning that KineMaster has (no blending modes for audio tracks for instance, or detailed audio EQ).
- Occasional performance issues on large projects.
- Fewer manual controls in some areas (e.g., KineMaster’s precise clip trimming with preview might be more refined).
- No native way to directly pay to remove ads or such if there were any – but currently there aren’t ads in CapCut like other free apps. (It might occasionally promote TikTok but that’s minor.)
- Some features require internet (like downloading certain effects or audio, though you can pre-download).
KineMaster Pros:
- Professional-grade editing features on mobile: multi-track, chroma key, keyframes, blending, etc.
- Very polished and stable after years of development.
- Real-time preview is often smooth due to optimizations.
- Precise editing tools (frame-by-frame trimming, envelope curves for volume, etc.).
- Asset store (if subscribed) can add a lot of content (like sound effects, clip graphics, transitions).
- Suitable for more complex projects due to better project management (multiple layers manageable).
KineMaster Cons:
- Free version watermark is a deal-breaker for many. The subscription, while providing value, is not affordable for everyone – especially when CapCut provides similar for free.
- Interface might appear cluttered or old-school to some users.
- Limited platform availability (no PC except via emulator).
- Exporting in free version always has that watermark, which essentially pushes serious users to either pay or not use it.
- Since it’s not fully free, the user community partly shifted to CapCut in recent years due to cost.
- Development of KineMaster has slowed a bit; some new features come but not as revolutionary as what CapCut’s doing with AI and templates.
Output Quality
Both apps can produce high-quality videos (up to 4K, 60fps). If using the highest settings, you won’t see much difference in output quality between them – the limiting factor is more your source content resolution and bitrate chosen. KineMaster allows custom bitrate selection for export; CapCut might have Low/Medium/High quality presets (which correlate to bitrates). If you know what you’re doing, you might get slightly more control with KineMaster’s export. But generally, quality is great on both. Just avoid the default low quality settings if you want crisp results.
Verdict – Which is Better?
For most users in 2025, CapCut edges out KineMaster primarily because it offers a huge range of features for free that you’d otherwise have to pay for in KineMaster. The absence of watermark in CapCut’s free exports is a massive advantage – you can create professional-looking videos without any branding, whereas KineMaster’s free version will plaster a watermark which is not acceptable for serious content.
Feature-wise, KineMaster and CapCut go toe-to-toe, with KineMaster slightly ahead in traditional editing features (multiple layers, blending, detailed control) and CapCut ahead in smart features (AI, templates, integrated asset library). If you’re a YouTuber or someone making longer videos with intricate editing on mobile, you might appreciate KineMaster’s precision and don’t mind paying to remove watermark. But a lot of people in the short-form video era find CapCut does everything they need and more.
Thus:
- If you want maximum capabilities and are okay with a subscription, KineMaster is still excellent. It’s like having a mini Final Cut in your pocket. It’s great for multi-layer compositing, possibly richer color grading (with LUT import in asset store, etc.), and has proven reliability.
- If you want a completely free solution that is powerful enough for 90% of cases and especially if you’re making content for TikTok/Instagram, CapCut is better because it’s geared towards that, and you won’t have to fight a watermark or lack of effects. CapCut is also constantly innovating, which means it’s likely to remain at the cutting edge of mobile editing trends.
For editing photos into videos (like slideshows or animated photo clips), both can do it, but CapCut’s trending 3D photo effect and template-driven approach probably give it a creative edge there.
In conclusion, CapCut has the upper hand for most users given its cost-to-features ratio. KineMaster was the king of mobile editing, but CapCut’s rise has challenged that throne stronglycapcutmodapkz.com. Many former KineMaster users moved to CapCut for the free experience. Unless you have specific needs that only KineMaster fulfills (or you prefer its interface), CapCut is likely the better choice in 2025.
If you’re interested in how CapCut stacks up against another PC editor, check out capcut pc.


2 Comments